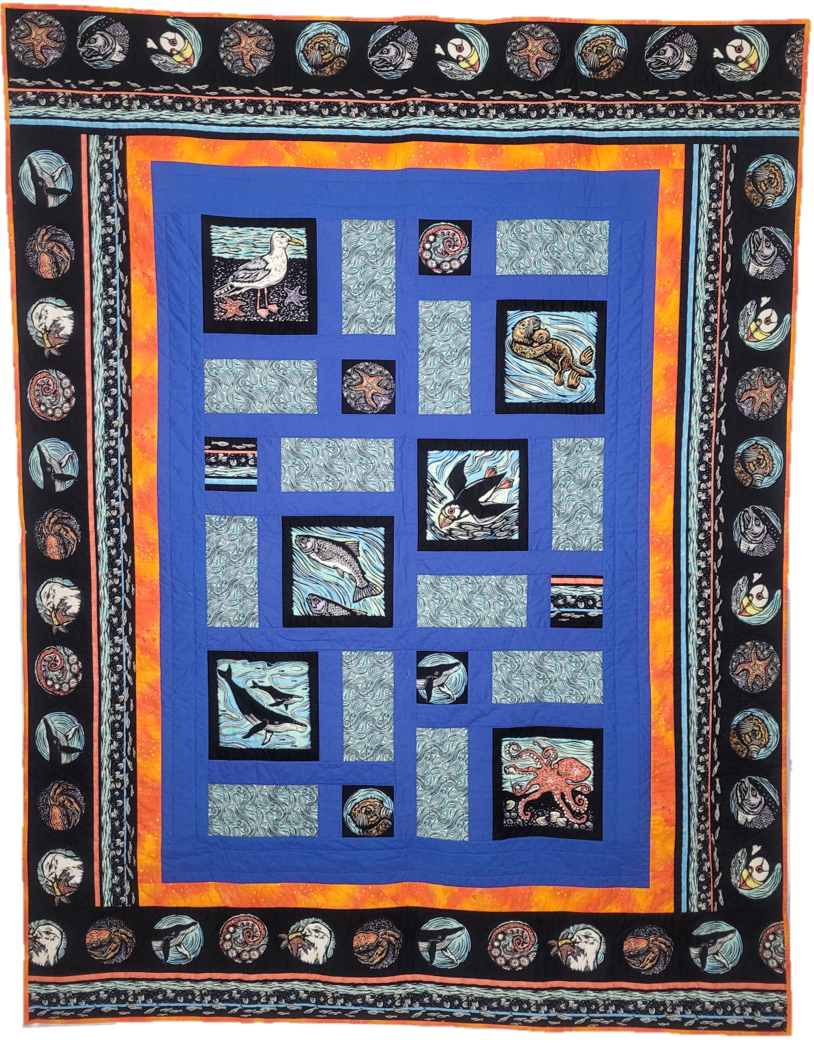
Getting the back ready
While the backing piece (doubled) is wide enough for the quilt, being monochromatic it has no real pop to it. I decided to sew a strip from my leftover fabric. It goes from top to bottom and is offset about 15″ to one side rather than being straight in the middle.
First, sew the pieces of the leftover wave, border, and fish pieces into a long strip. I threw in a few of the back fabric as spacers. I trimmed the strip to 5” wide, you could have a wider strip if you want but I had was using leftover 5″ cuts so kept to that size. It wasn’t like I needed to make it wide enough to fit, it already did that.
The two wave fabric pieces were sewn to either side of the strip. (When I basted the quilt together, I made sure to have 5” of the backing past one side so the strip would be offset on the back.)
Then I pressed it well, folded it in half loosely and laid it on the bed (you could use a table, floor, or over a couch back) to ‘cool’.
I repressed the top and turned it over to press the back seams flat. This might seem overkill, but it helped to get out any wrinkles in the top from folding it after I made the top and setting it aside until I could quilt it. Ironing also flattened the seams in the way they should go- or, just flattened the seam if it twisted from one side to another. If you have to fold it after the final press, fold it in half loosely and lay it on a bed or a flat surface (or over a couch back) to ‘cool’. If you fold it on the backing fabric that is cooling, lay one on one side of the bed and the other on the other side so you don’t crease the middle section.
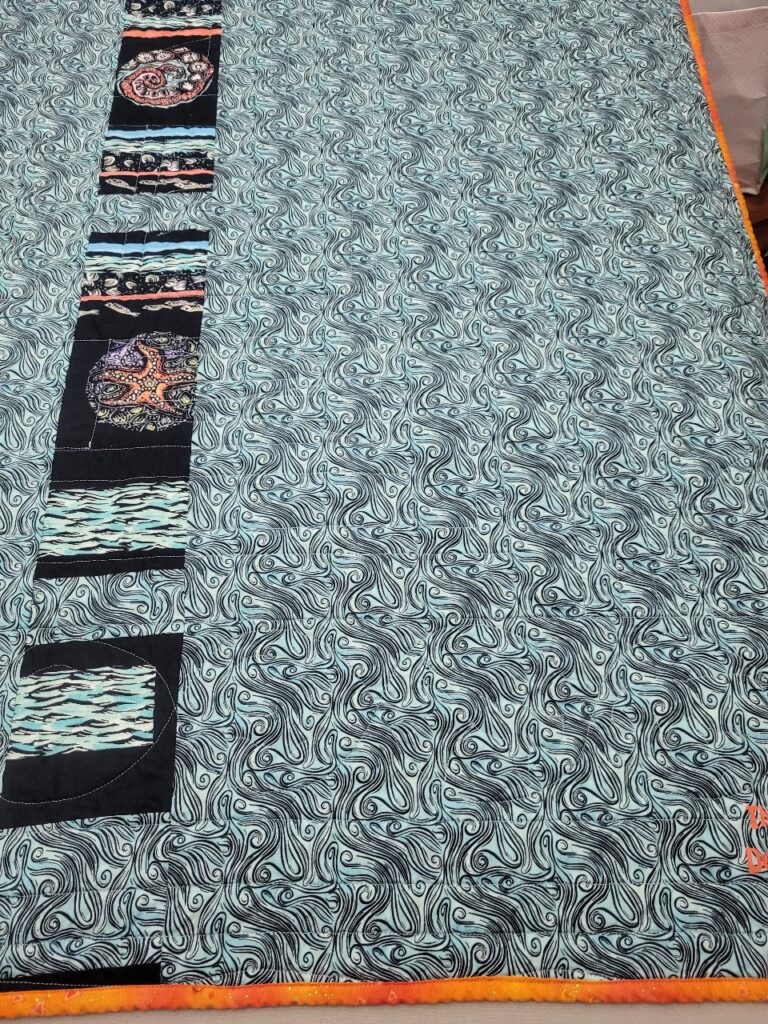
Getting ready to quilt
***Links are to the videos that I watched and to the items that I bought. I may get a small commission for the items but your cost to purchase them will not change.
This link will take you to my review page where you can check out my reviews of the items that I purchased. I tell you what I like about them and some of the things I didn’t like. You can take the direct link to the item as well without checking out my reviews.
| Quilting on a domestic machine you have to baste the sandwich together first so it won’t shift around on you and create wrinkles and tucks on either front or back. Rather than crawling around on the floor (with space I don’t have) and poking myself with pins, I decided to look into basting sprays. I highly suggest giving this method a try. You don’t need any specialized equipment as you can drizzle the glue directly on the pieces and spread it with a foam brush- but that might take some time to do. Investing $4 for a spray bottle or $20 or so for a 2 pack of an oil mister was well worth it to just spray the quilts down. The second mister I put to use in the kitchen as an oil mister. Commercial basting spray is costly and difficult to get in Alaska and in my small town none are usually available. Plus, as they are an aerosol, you cannot get it shipped without paying as much for shipping as the can itself. Here are the best videos I watched for other kinds of basting spray: Glue basting with a mister (this is the idea I went with)- https://youtu.be/amOefjAPBjc– from Slightly off Quilter (watch parts 1 and 2) The oil mister I bought from Amazon can be found here. Be mindful that with glue basting you do want to wash the quilt after binding. You can see the droplets of glue in my photos. But the basting does wash out very nicely. Making homemade spray baste- https://youtu.be/n0uESmrqSQ0 from Holly Anne Knight @ String and Story using salt, flour, and rubbing alcohol. However, with this spray you need to quilt, bind, and wash within a few months, three at the latest depending on the humidity and where you store the sandwich. The flour ingredient tends to attract silverfish and it has been known to get moldy the longer you let it sit. Sandwiching your quilt using a table: With pool noodles- https://youtu.be/i6M-I20Tirw from American Patchwork & Quilting and https://youtu.be/I0j7u8bGW7A from the Sewing Channel Basting with commercial basting spray- https://youtu.be/E6E-yd299Sk from Quilty Love and https://youtu.be/fFqfYQdyzo8 from Christa Quilt Basting a quilt larger than your table- https://youtu.be/XPaIzuoY6Bg from Hunter’s Design Studio I sandwiched Sea Says: Dive on In! in less than 30 minutes (and my binding clips had not arrived yet). Taking it to work and laid it across two tables- but forgot to bring my iron so I loosely folded it in half, then quartered it and let it dry on a flat surface. Two weeks later I was quilted it. I put no extra pins in it to hold it while sewing and the glue basting held up through all the twisting, folding, tugging, pulling of the sandwich as I flipped, turned, and pushed the sides through the domestic machines throat. |
Since this was the first time that I would be quilting with my new machine I sandwiched a little baby quilt that was literally just two pieces of fabric with batting in between to test quilt. You can read about it here.
Once I sewed that little quilt I felt confident enough in the glue basting to start away from the exact middle on the Sea Says: Dive On In! quilt and work outwards.
I had 4 colors of thread- one for the backing and rectangles, a color to match the sashing, a black for the borders and blocks, and the pop color. I would 4 bobbins in the backing color and end up winding 3 more to finish up the quilting.
Note- My machine has an automatic thread cutter which was amazing when quilting this. Otherwise, I would leave the threads and cut them later, then you can pull them to the back and bury them.
At each start and stop I backstitched. This means I did this A LOT but it secures the stitching and you don’t have to tie the threads, you can just bury them and trim the ends.
I highly suggest having plenty of surface on your table to support the quilt as you sew. I was quilting this at a retreat and my machine was in the middle of the table so the end supported the quilt. Being supported will help keep your stitches even.
Even if you place the extra in your lap (as when you have rolled up the side to sew the sashing), make sure you have enough on the table to sew without putting pressure on the quilt. You don’t want to be sewing along and hit a dead stop because you have leaned forward enough to pinch the quilt between you and the table, and it isn’t moving. That pretty stitch length will hit teensy tiny very fast. (Ask me how I know this… 🙂 )
I suggest having a good 12” or so up on the table- enough to sew with and you can still see over it.
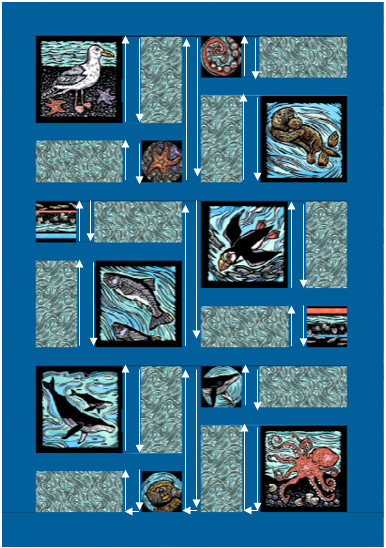
Rolling up both sides like a scroll, I started at the top middle row sashing and sewed down one complete side- top to bottom.
At the cross sashing I hopped to the next vertical sashing all the way to the bottom. I sewed across the bottom and continued back up the other side of the sashing.
Once back to the top I moved to the right and stitched the long and short sashing between the blocks. Across the bottom and then back up again. Repeat for the final vertical sashing. Don’t forget- at each start and stop I backstitched.
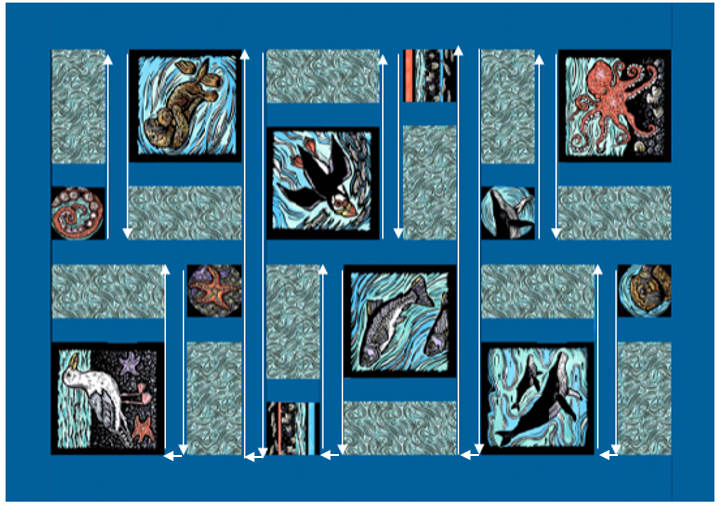
Repeat the process sewing the horizontal sashing strips, rolling up the top and bottom to get to the middle. There is more of a step over with the horizontal sashing as the blocks are offset from each other.
If you don’t have a thread cutter you can carefully cut the threads when shifting over or leave them attached- it is your preference.
However, I would cut the threads once you have finished that section, so the long threads won’t catch on anything when you are twisting and pulling the quilt through. It didn’t happen on this quilt, but I have had it happen on others that I’ve done.
Once I have gone up the last vertical sashing, I leave the needle down and pivot, so the wider sashing border is ready to sew.
I sew all around the border on one side and when I get back to the start I move over and sew next to the pop color border.
The central part of the quilt is not going to shift anymore, it is now time to work on the borders.
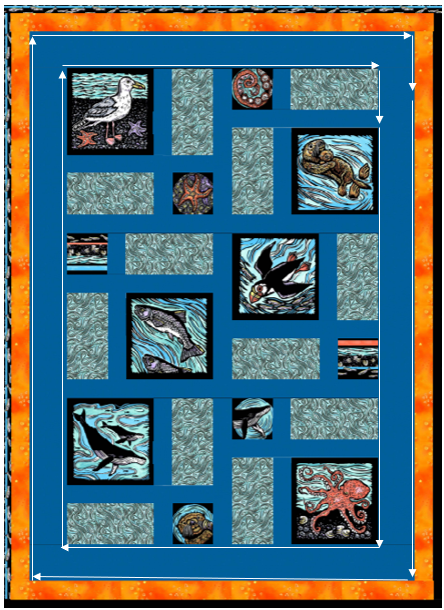
As I did not have my binding clips when basting I knew that possibly my border backing might have a tuck or two around the edges and wanted to check before sewing.
Turning the quilt over I smoothed the back and sure enough, there was a wrinkle or two that would be sewn in if not fixed.
Gently pulling the backing away from the batting I smoothed one end down and pressed it back on the batting. It stuck fairly well. I did place a pin at each corner, so if I needed to tug it straight all three layers would tug together.
I worked on one side at a time. First the two ends, then the two sides. I changed to black thread on top for the borders.
Although the photo is of a section, I sewed from one seam to another, starting at the pop color.
The first line sewn was in the black just next to the pop border. I sewed along the seam all the way across. If you want, you can just sew at the border and not go out to the sides. This will echo the blue sashing. This is what I did.
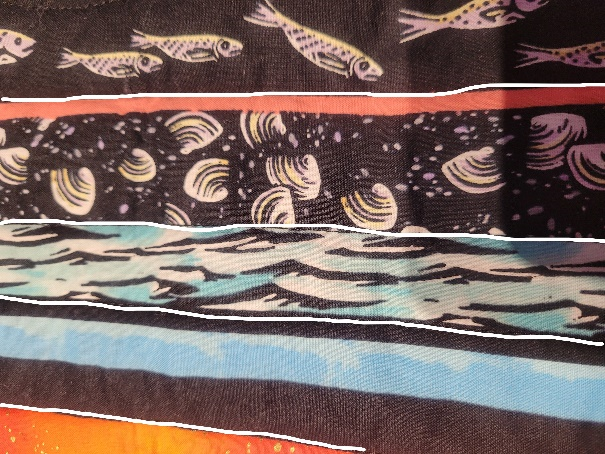
The next line stitched was between the blue line and the water- down one side and then again on the other side- the blue line and the clams.
And the last straight line is on the other side of the red line, just under the fishes. You read that correctly- the last straight line. After all the straight stitching you’ve done so far, you should be comfortable enough by now to sew a curved line for the next part of the border.
Starting at one end- like the gull side- I did a slow, easy curve around the motif. I tried to keep the walking foot edge next to the motif.
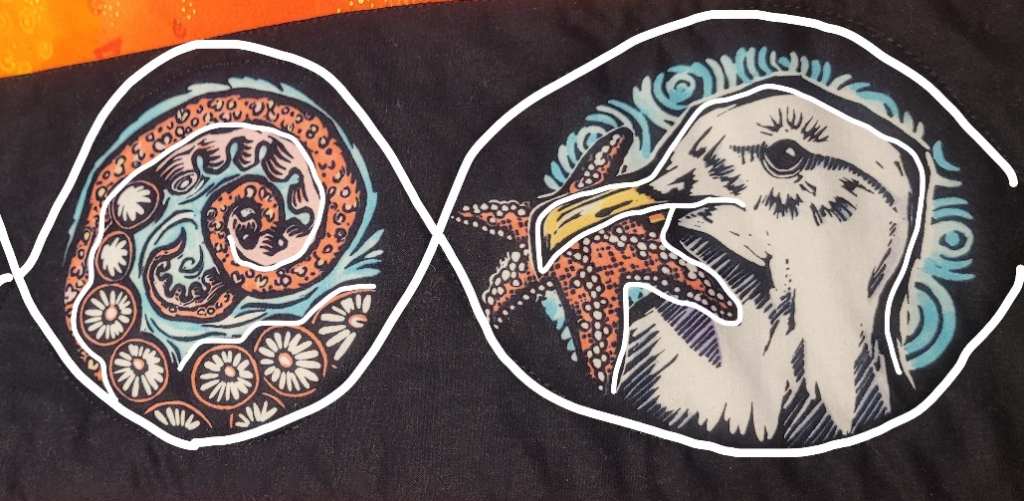
Go steady, and don’t be afraid to go slow. Gently pull the quilt around to create the curve.
I placed one hand close to the walking foot to help guide the fabric and gently tugged the quilt around with the other hand. The walking foot and feed dogs will continue to pull the quilt through evenly and the stitch length will remain the same.
Up and over, down and around. When you get to the end, roll the extra fabric up to fit in the throat plate and repeat on the other side of the motif.
The last line is just a little wavy one, above the fish and under the round motifs.
The reason I sewed this line was there too much open space unquilted.
I use the palm measurement against the peaks formed from the motif and it fit inside that line and the one next to the red stripe. This little meander wave filled it in nicely.
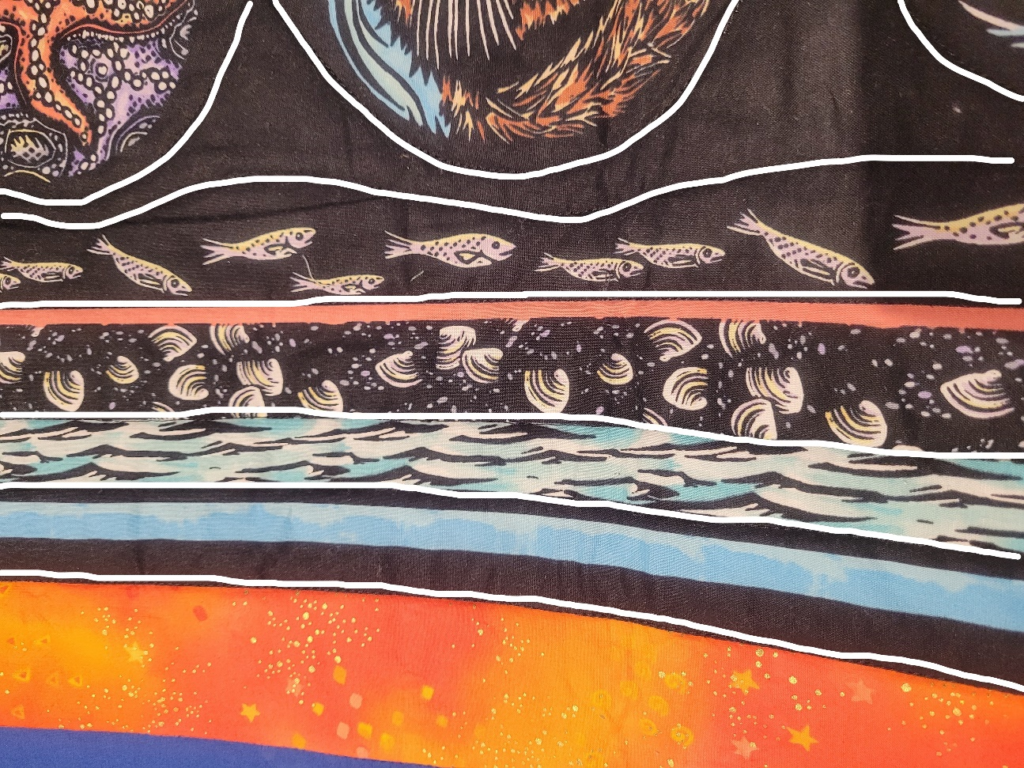
Please note- any area larger than my palm I make sure to put stitching in there. Even though batting says you can quilt it every 12”, quilting it only that far apart means the batting will break up and shift when washed. As my palm is about 3” across I make sure to put some stitching inside that area just to be able to wash it frequently. For a small child’s quilt that could get washed hundreds of times over the life of the quilt you want to quilt even tighter than that.
I repeated the process for the other three borders. First the bottom edge, then the sides. From checking the backing and resetting to take out possible wrinkles to the final curved fish line. The order will be different on some of the borders as the fish will either have a dominant coral stripe or a dominant blue stripe, depending on which side of the length of fabric the 10” was cut. The lines sewed were all the same, I just worked outwards from the pop color.
Now that the quilt was stabilized from top to bottom and it wasn’t going to pull away from the glue and shift no matter how much I tugged, twisted, or pulled, it was now time to sew in the details.
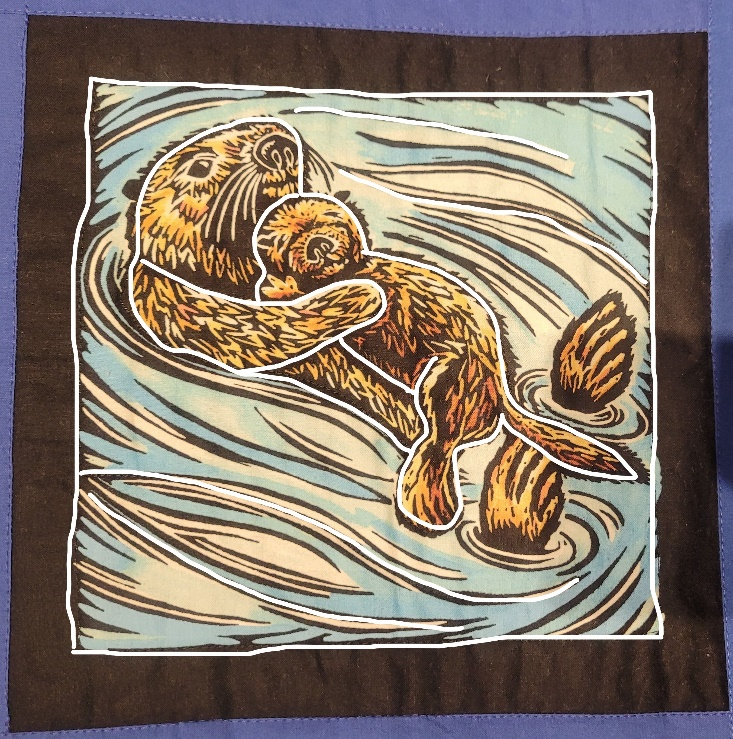
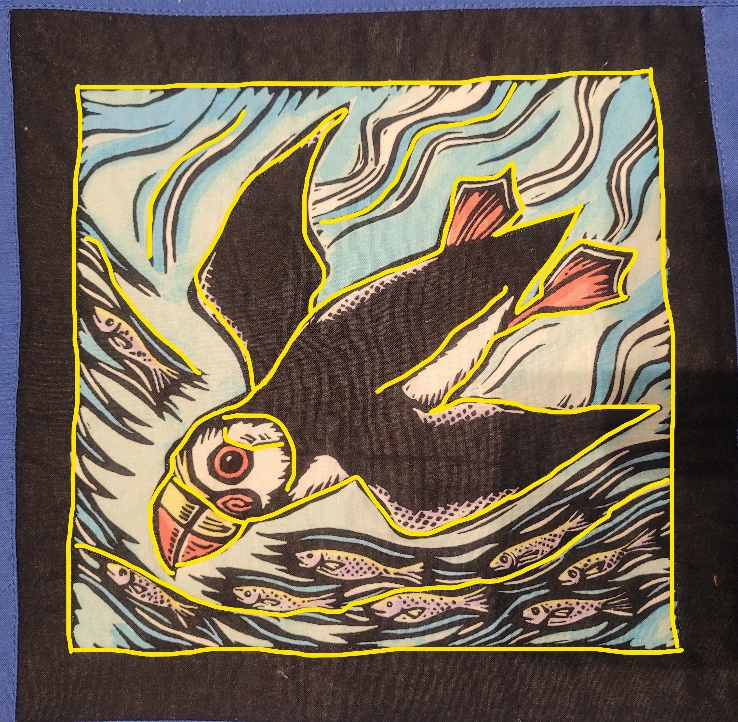
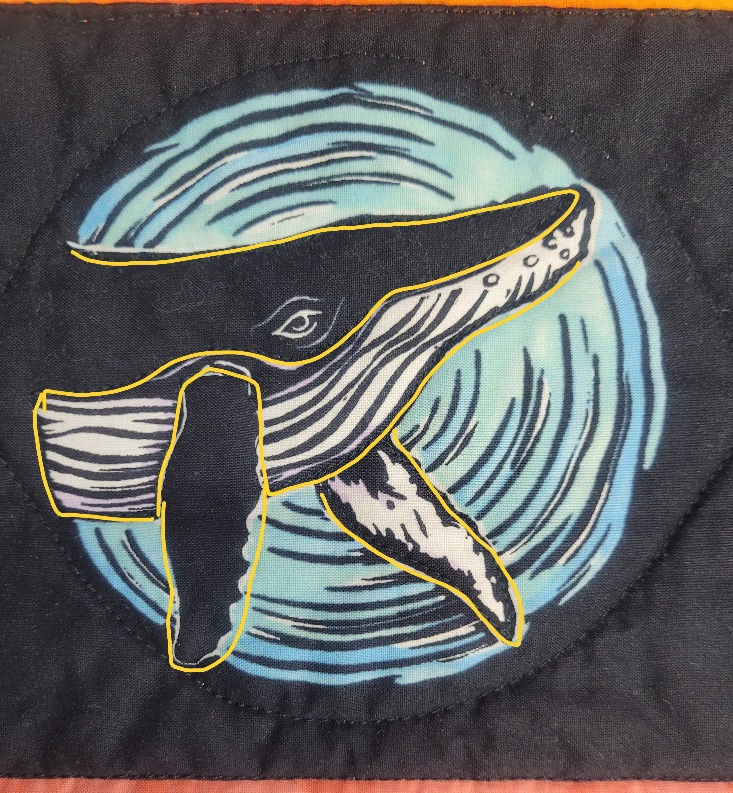
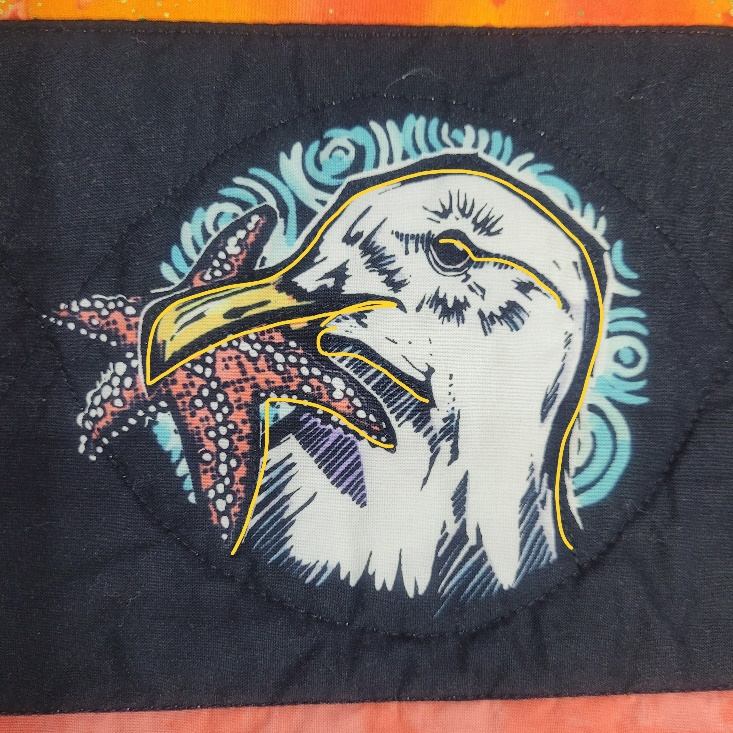
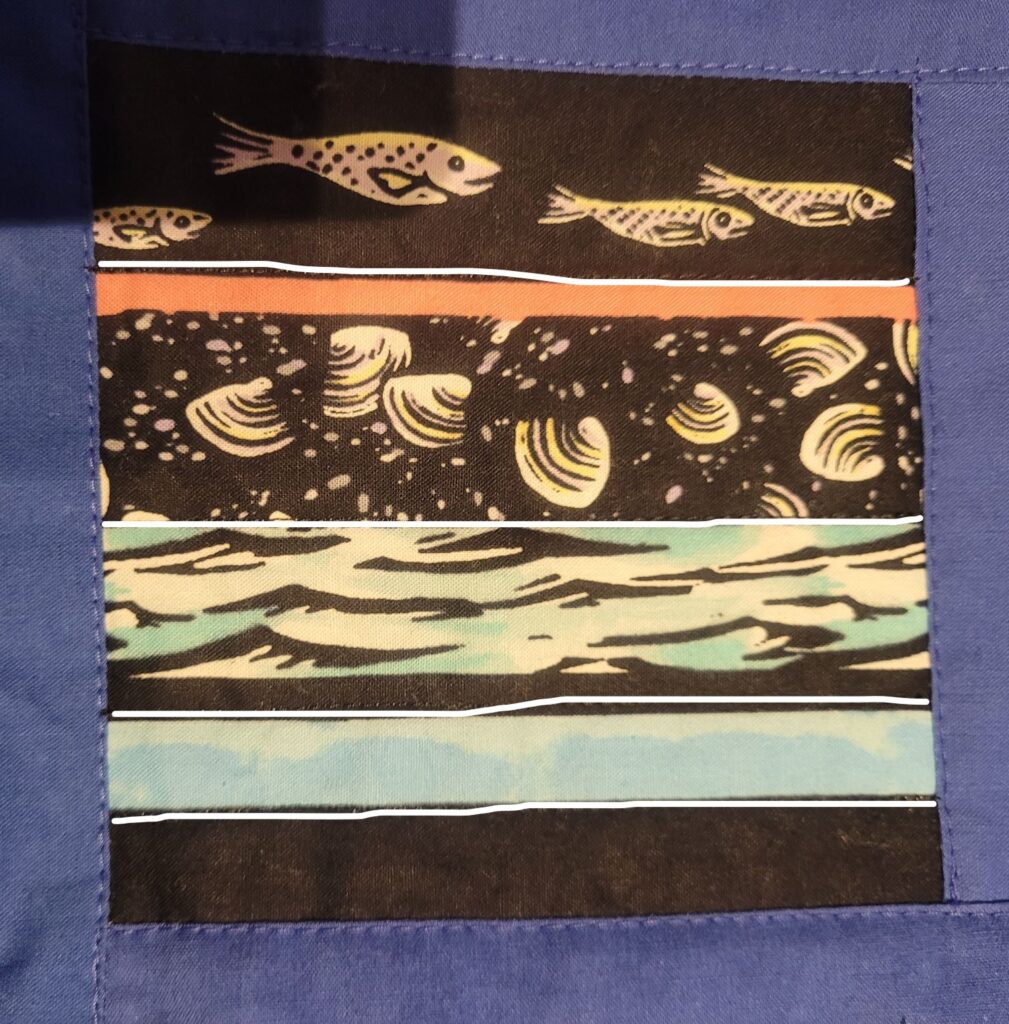
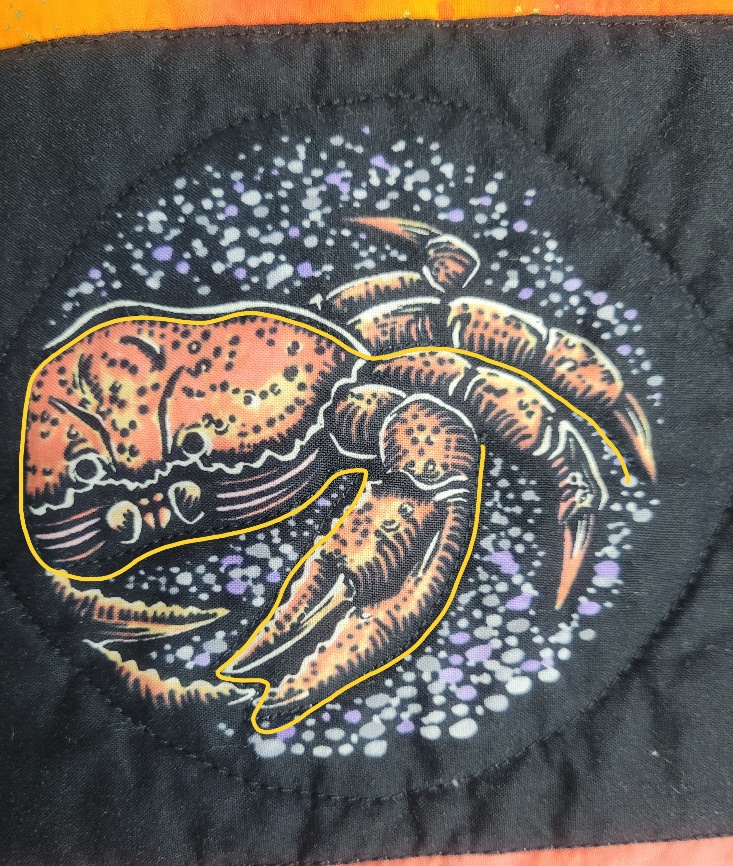
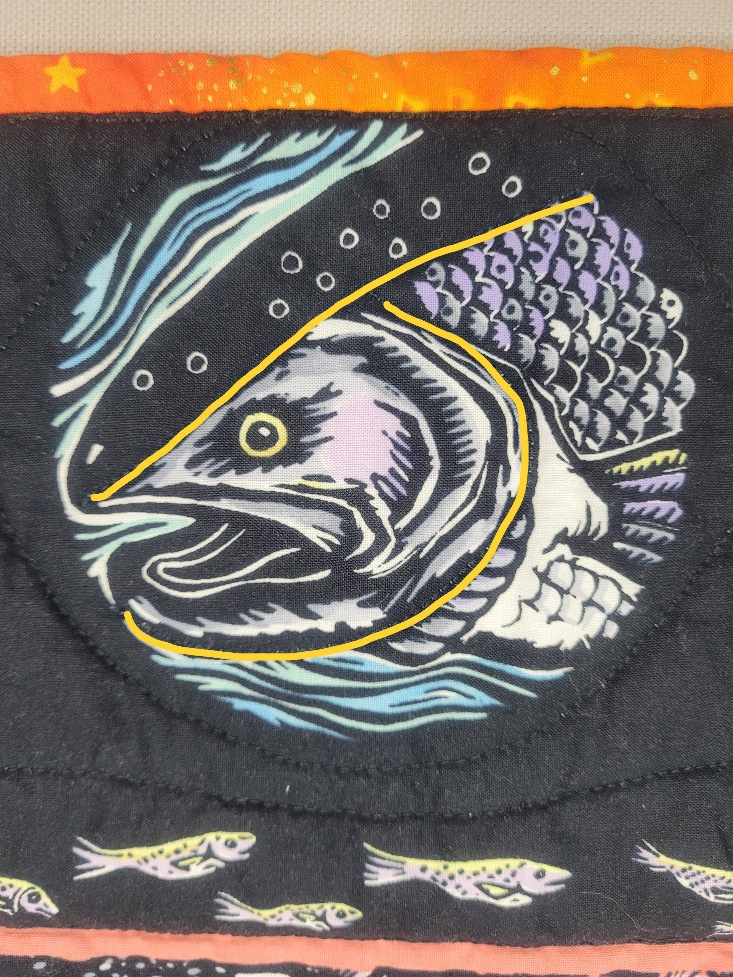
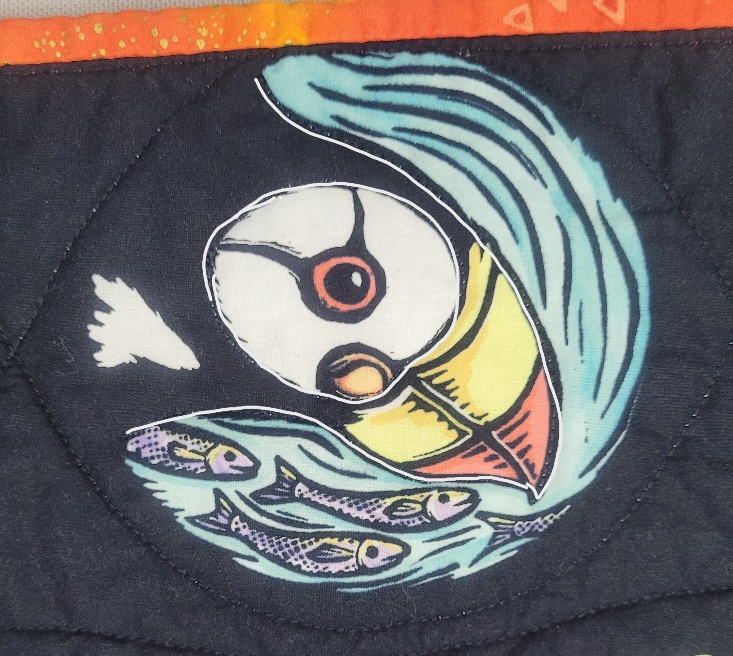
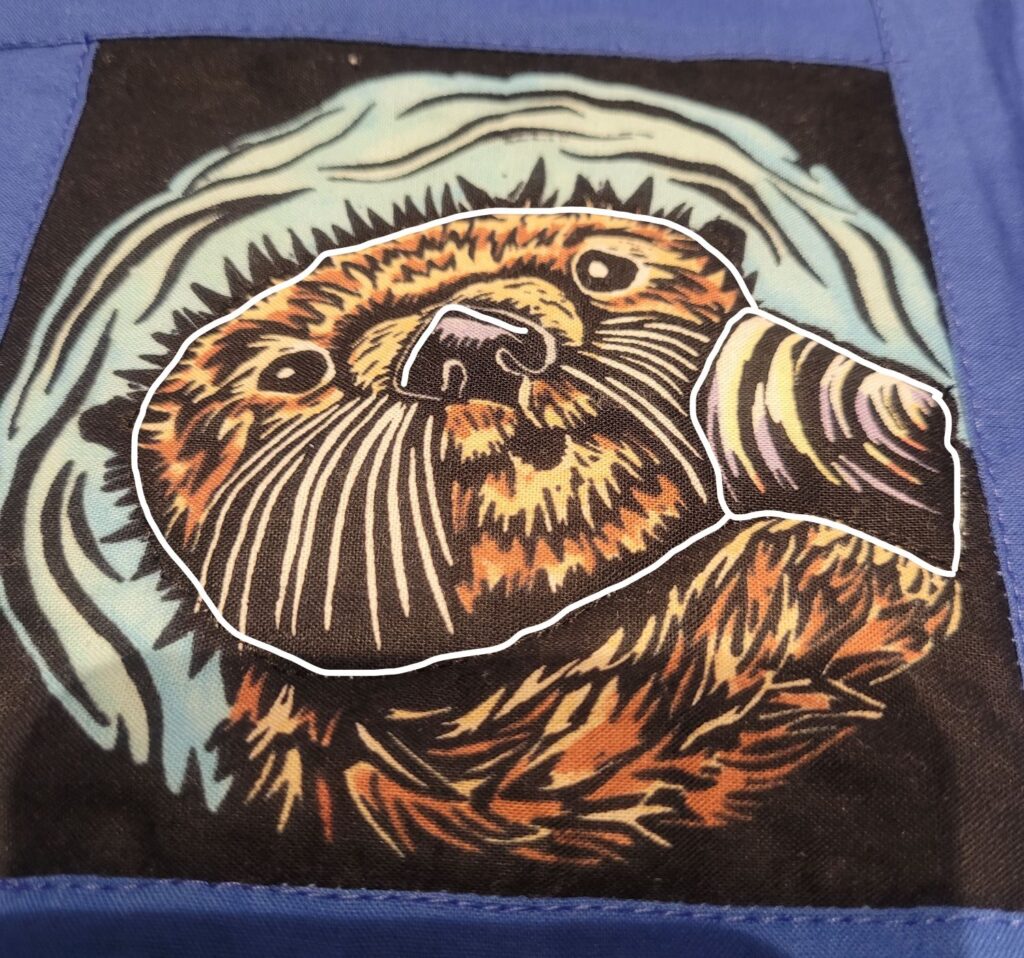
I sewed the blocks in no particular order, just what was next in line so I didn’t have too much strings in between blocks. I have closeup photos with a line showing what was stitched down. Some lines are white, and some lines are yellow.
I stitched in black thread and always stitched the outside of the picture last.
These are what I did, you can do the same or different. Your quilt is yours and will be your memory. Just remember the palm rule- if the space is bigger than that, do something in the middle to hold the batting. I also went back over my quilt after binding to check the quilt spacing and quilted some more in some areas.
The otter:
I outlined the complete otter.
Then stitched in the front leg and the pup’s head, body, and leg.
I stitched along two water ripples on both sides of the otter. And last I outlined the water box in the black.
This outline helped to give it a ‘double frame’ with the sashing stitching.
| The Puffin: I outlined the bird first. The top wing I stitched across the body and then went back and stitched the wing. I defined the head, went around the eye and beak. Put a line down the inside of the body. And in the water I sewed a line through the school of fish, two ripples in the top left and one ripple behind the upper wing. Then outlined the square. |
| The Salmon: Easy curves along the salmon bodies. I went back and outlined the fins, mouth, head, and tail. There were a lot of gaps so I just followed a line of water ripples in a few areas where needed. And, of course, outline the picture. |
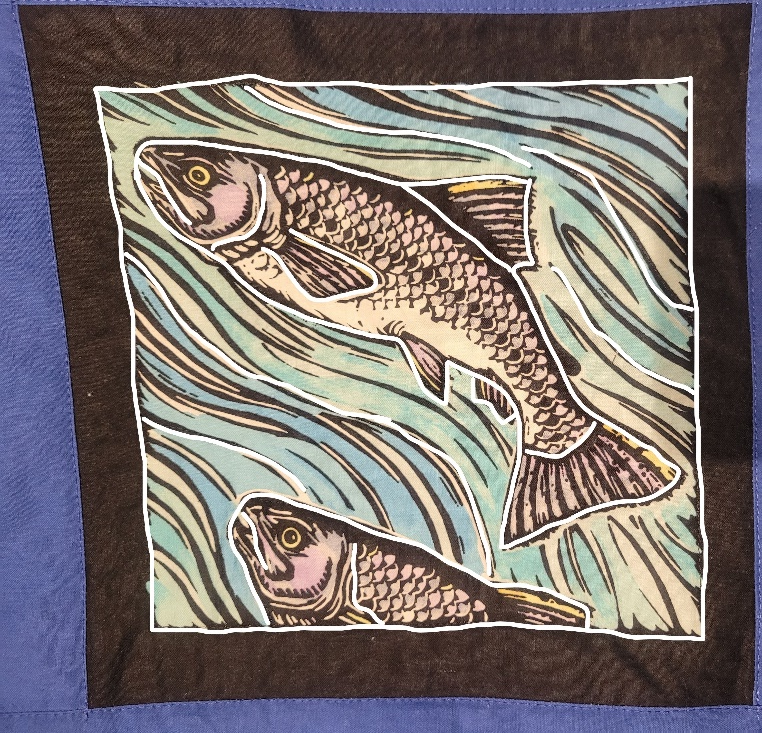
I am still thinking about going down the dark scales line at the middle of the complete salmon, it is borderline but I would prefer to err on the side of caution rather than have the salmon look ready to spawn some eggs later on after repeated washings.
This was a relatively simple one to do. Instead of turning the quilt I started at the salmon’s mouth and worked my way to the tail, clipped the threads, and then did the other side of the fish. The water was all the same direction, too. It was only when I went to do the details that I needed to turn the quilt at all.
The Octopus:
There are so many choices to do here.
I outlined one side of each tentacle, usually the ‘smooth’ side but as the suckers are heavily lined in black stitching right next to them was no problem.
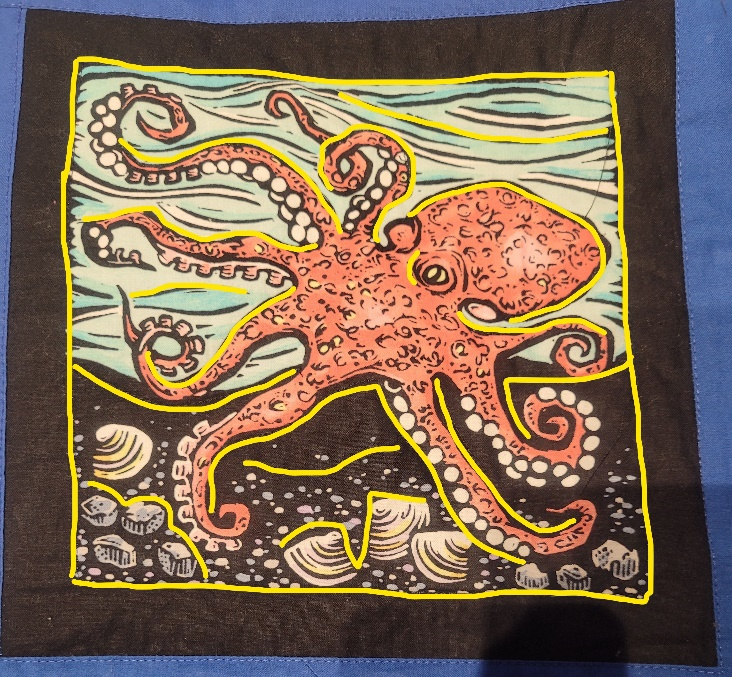
Turning those sharp curves was a start/stop affair and always done when the needle was down.
Don’t forget to smooth out the fabric before stitching, a little tug to straighten the area from turning so you don’t accidentally sew in a tuck in the backing.
And again, around the outside of the design. This was one that I went back to afterwards and sewed some more stitching- in the waves above the head, around the stones in the lower left, along the pebble line just under the tentacles, and the top of the two clams.
The Seagull:
The great part about the gull is that it is right in the center of the block. Outline the gull, fill in the few feather lines, beak, and the neck part. Down the underside of both feet and legs.
Two sides each of the starfish, and the water edge plus a wave in the empty space by the neck.
And the outline of the picture- all the yellow lines.
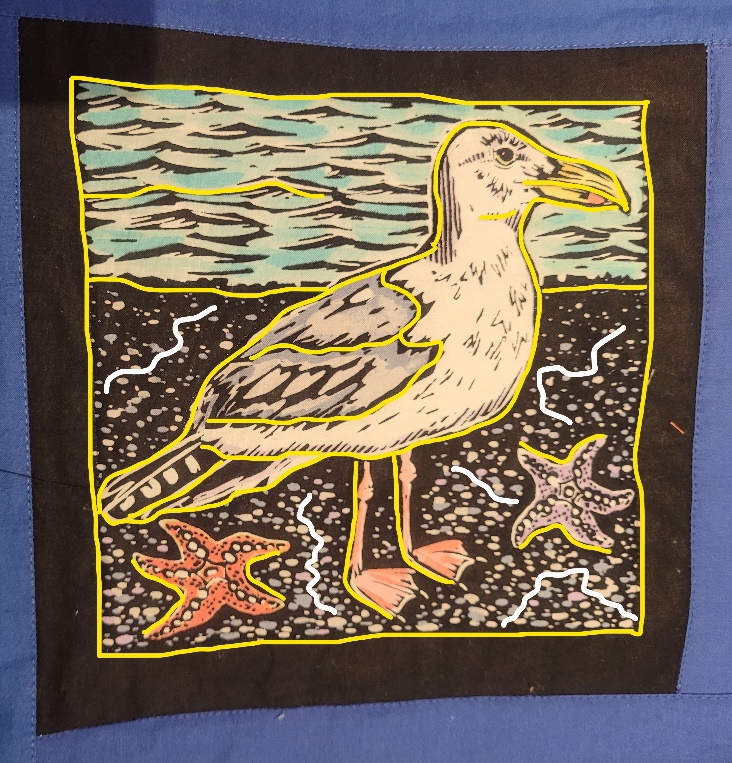
This is another one where I think I will go back and do more. Random lines in the space to either side of the gull in amongst the pebble (white lines) and the other ‘large’ spaces that I see. These are spaces smaller than my hand, but a black line on the black beach won’t hurt it. And you don’t have to wiggle it around like my lines, just go between the pebbles. The great part is that they are dark enough a line of black thread really won’t be that noticeable.
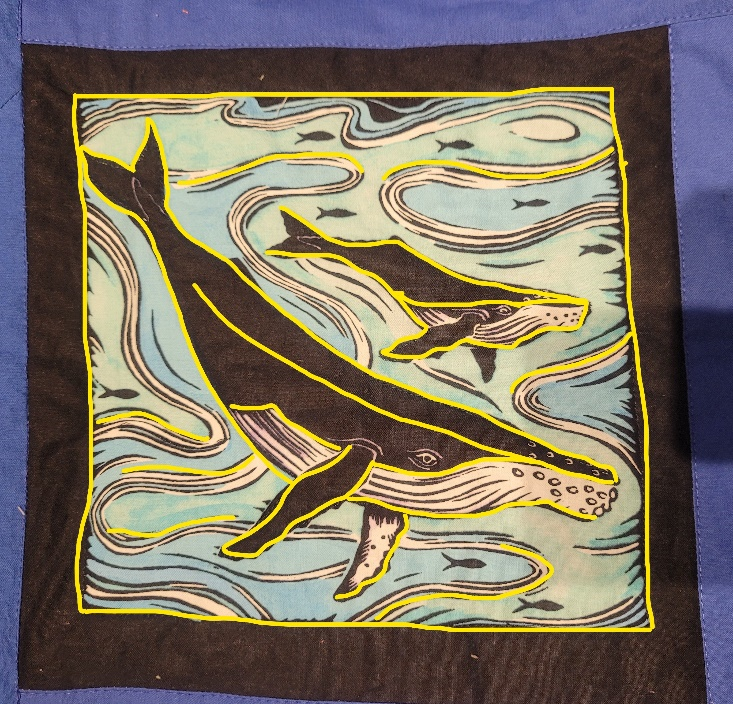
The Whale:
The whale has a lot of straight stitching until you get to the waves.
I outlined both parent and child whale and the large front flipper on both of them.
A line down the middle of the parents back and the belly markings on both.
Around a lot more water on this block than the others. While I curled around the one at the bottom, on the others I just stopped and went onto a new wave.
And again, the outline of the picture.
And finally quilting the small motifs in the blocks and borders.
I finished all the motifs in the border. They were a lot easier to do as I didn’t need to roll up, shove, or tug the quilt through my throat plate. I kept just enough of the quilt close to me so that I could rotate the available quilt fabric as needed. The rest was on the table.
The good news is that you have many chances to do the same motif so you can switch up what you sew- you don’t have to make it exact for each repeated motif. No one but you will know the difference.
As of this writing have not gone and stitched the circle around the motif for the 5” squares, but I am thinking about it. There are only six of them after all. The border ones are already sewn around.
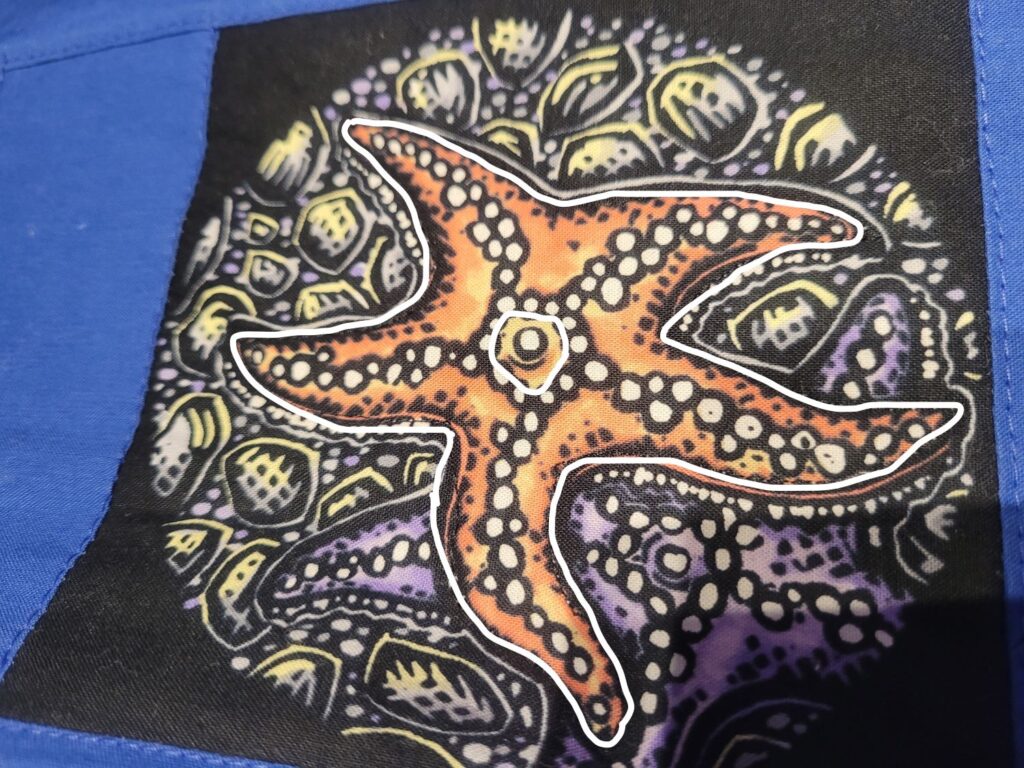
Starfish:
I went around all the legs on the starfish, then carefully circled the center.
If you feel the need you can go back and outline the purple one in a few spots.
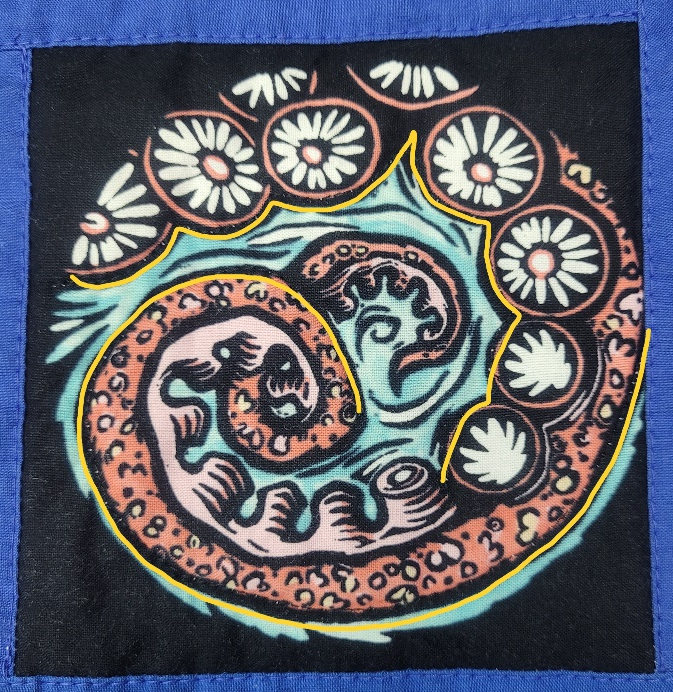
Octopus tentacle:
I did a line to around the curl on the smooth side of the tentacle, then switched over to the sucker side and carefully sewed the bumps.
Whale:
Like the larger block, I outlined the body and the flippers.
Here you can see what I mean about the border motifs already being circled.
Gull:
Outlining the head and the ‘inside’ part of the starfish. Then the line at the eye.
Fish:
I used two fish as 5” squares in the center- one with the large blue stripe and one with the large salmon stripe. Each one had differences- the fish, water, and clams were in different areas.
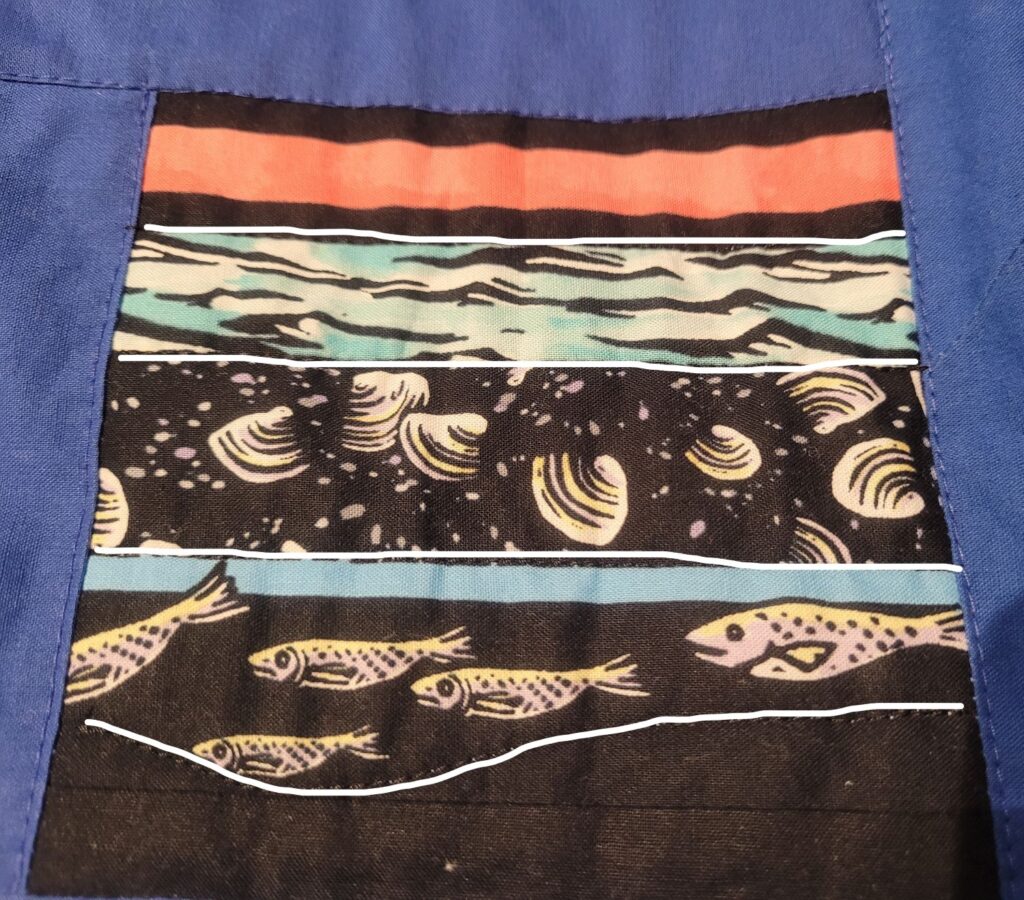
I repeated how I worked the borders- both sides of the water, along the small stripe in the block, and a curvy line along the finish.
Crab:
I usually started on the right at one claw end, over the top of the carapace, around and under the carapace, and outlining the claw back to almost at the beginning.
I did this in one long stitch, no stopping or starting needed.
| Salmon: Around the head and the line down it’s back. Of all of the motifs, this one was the simplest to do. If I had done the salmon in the center, I would have also done the flipper as that was not already circled and I think would have left too much open space. As it is, this is in the border and it is already circled close enough. |
| Puffin: A close second in simplicity, around the head and around the white part of the eye. I did jut out at the beak tip to follow the black line. |
Otter:
Around the head and the top of the nose. On this one I also outlined the oyster as it was in the 5” square. But I didn’t always for the ones in the border if the border lines were quilted close enough.
After all that curvy sewing I was ready to get back to some straight sewing for a bit. The large blue sashing was wide enough to need something but I didn’t want a meander and there was no way I could copy the wave lines.
I had a roll of wide painter’s tape. I placed the quilt on a flat surface, large enough to hold most of the quilt, and placed my long ruler 1” from the pop color into the blue and I laid the painters tape right on the rulers’ edge. I was careful to create a sharp line for each corner.
The bonus was the inside edge was pretty close to the 1” mark as well. I changed back to the dark blue top thread to match the sashing.
I sewed against the edge all the way around the outside of the tape, then sewed on the inside edge.
As you can see from the photo it gave me two crisp points at each corner.
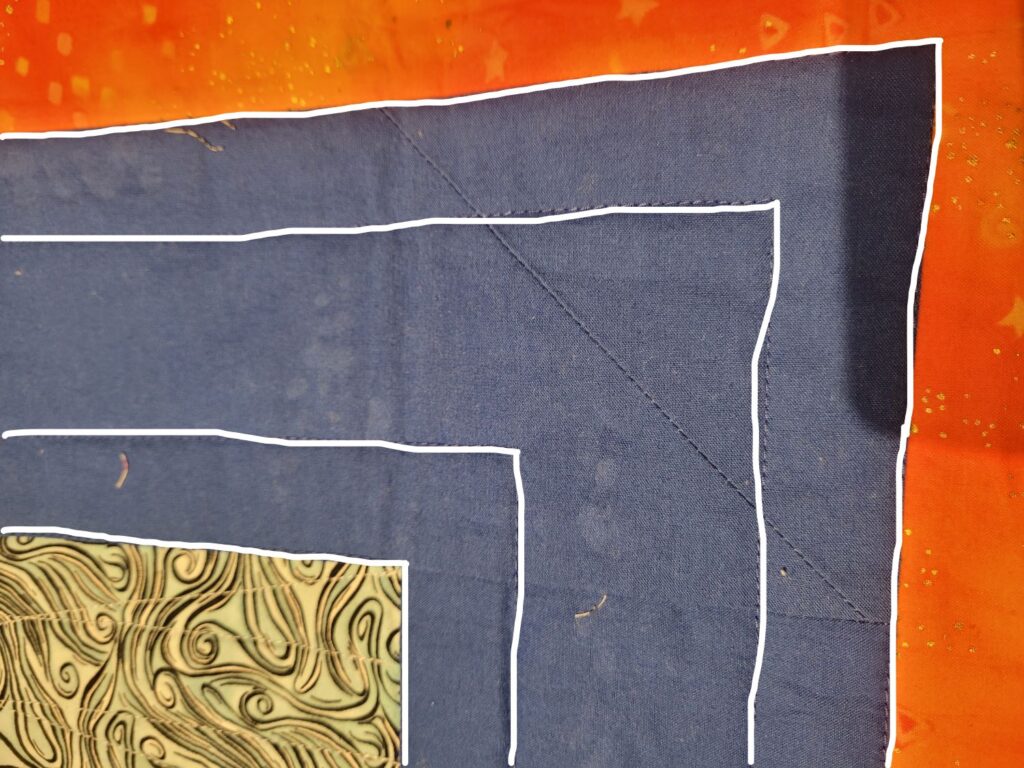
When I needed to turn the corner I left my needle in the down position and rotated the immediate quilt area and sewed about an inch.
Leaving both the needle and foot down to secure that immediate area I then pivoted the rest of the quilt and lined up the side for me to stitch, then raised the walking foot to straighten out the sandwich. Once straight to stitch ahead, I lowered the foot and stitched. You can see the glue spots in this photo. Don’t worry, it washed out just fine.
| Now the rectangles. This thread is the same as the bobbin thread as I used the aqua wave on the back. I knew I couldn’t match the curls and q’s of the wave fabric so I didn’t even try. I just went with a simple straight stitching, just offset on each rectangle. I tore the painter’s tape into sections and placed one on each of the rectangles, and in each rectangle the tape was in a different spot. |
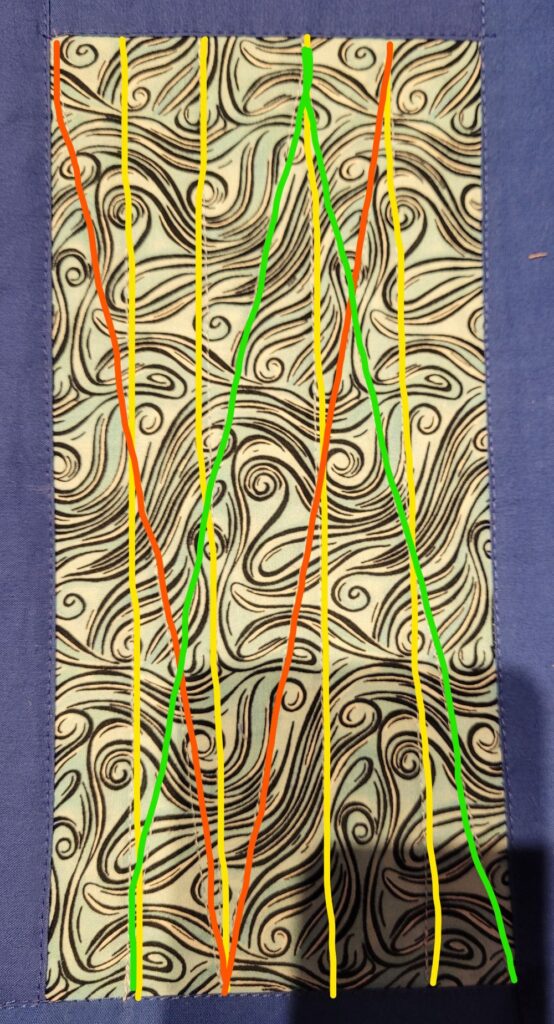
Then stitched 2 lines to each side (the yellow lines) following the edges of tape. You don’t need to do them exactly straight like I did, you can easily put a slight curve in it to be more organic.
Then I took the tape off and stitched two more lines from top to bottom. Again, these were in different areas in each rectangle.
I was getting tired and the finish line was so close, so I backstitched at the bottom and moved the quilt so I could get to the top again instead of turning the quilt and stitching down the rectangle.
Next I went from one corner across one line to the bottom of the second line (green).
This time I did turn the quilt and stitched across one line to end at the end of the next line. But you could just as easily backstitch here and move to the top of the rectangle and over one line and stitch down to the outer corner, following the orange line. But don’t forget to repeat the process from the other end to connect the two lines.
You can do more lines, you can do less lines, you can do wavy lines like a sinuous curve. You can do a box 1” from each of the edges and a line in the middle. Any of these will look great.
And can you believe it? The quilting is done!
I carefully looked it over and snipped the threads and buried them in the sandwich.
I squared the quilt to trim off the excess batting and backing. To keep the quilt straight and even I trimmed at 9 ½” from the pop color. I could have stay stitched around close to the edge but I was ready to finish.
I changed to the pop color thread on top.
Your binding should already be cut. Take the time now to sew the ends together. Press the seams, I usually press my binding seams open but that is a personal preference.
Press the strip in half all the way down the length. And use your preferred binding method to sew on the binding. I sewed on the front and turned to the back.
I changed my bobbin to black thread as I would be stitching on the back.
Stitch down the binding.
After stitching down the binding I went back over the whole quilt to and did more quilting in areas that I felt needed it. While this quilt would be a show piece for the shops to review yours might be for a child or a guest bed and need more stitching.


